Note: Microsoft has launched new enhanced framework named "Microsoft Dynamics AX 2012 Data Import/Export Framework" as replacement of Data Migration Framework. Please check details at Technet.
Purpose: Purpose of this post is to show how to create a new CSV file to use for Products Import using DMF. DMF ships with default template of item to help user as well, but we will see how to create our custom CSV file for items import. The same process is used to prepare custom file for any entity.
Prerequisites:
1. Data Migration Framework installed and running on the computer
2. Basic understanding of navigating Microsoft Dynamics AX 2012
3. Basic understanding of AX 2012 table fields


See below screen for field list of items

Following are standard fields required for proper posting of Requisitions, Purchase Order, Sales Order, Inventory Posting, requirement may differ user to user. User can do more settings after import or before import of items.
NAMEALIAS - Product Name


1. SEARCHNAME
2. NAMEALIAS
Note: If values are changed only in SearchName field and not in Namealias then Search Name won't be changed in items list, so always change values in both columns and import data again in system, don't use staging to target operation but the complete process of Get staging data and Copy Data to Target needs to be run to take changes place.


AX Version Used: AX2012 RTM
Company: CEU
Entity: Products
Data Migration Framework: Beta Version
Document Version: 1.0
email: mansoor_adeel@yahoo.com
mansoor_adeel@hotmail.com
Purpose: Purpose of this post is to show how to create a new CSV file to use for Products Import using DMF. DMF ships with default template of item to help user as well, but we will see how to create our custom CSV file for items import. The same process is used to prepare custom file for any entity.
Prerequisites:
1. Data Migration Framework installed and running on the computer
2. Basic understanding of navigating Microsoft Dynamics AX 2012
3. Basic understanding of AX 2012 table fields
Process
1. Navigate to Data Migration Framework->Processing Group
2. Press Ctrl+N or New Button to create new record, provide Group Name, Description. Press Ctrl+S to save the record and Entities button will be enabled, I will use PIF as Name and Product Information System as description. See below screen shot

Select Entity
Select the Processing Group and click Entities button at top, it will show another screen to add entities in processing group. Select Product as entity from entities list and provide the file Source Data Format. I will use CSV as source data format. Refer to section Setup source Data Format section in my post for Import Customers using Data Migration Framework to see how to create new Source Data Format. As soon as Source Data Format is provided Generate Source File button will be enabled. See below screen shot
Generate Source File
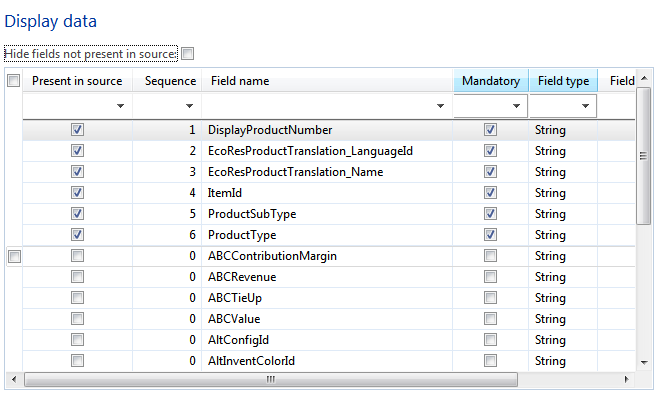
Now click on Generate Source File button and a wizard will start to create the file, click on Next button, a screen will appear with a list of all products related fields. Details of the columns shown in the screen is as under:
1. Present in Source - If checked, this field will be selected to add in source file
2. Sequence - The sequence in which selected field will be placed in source file, use Up & Down buttons to change the position of field.
3. Field Name - Name of Field
4. Mandatory - If checked, it means this is a required field to import the line item otherwise an error will be generated by DMF during import
5. Field Type - Describes the type of data required in the field being selected to import
6. Field Size - Maximum length of data, which could be imported
See below screen for field list of items
Now select required fields from the list and click Generate Sample File. System will create the sample file, save the file at some location and populate data in the file. User can use Microsoft Excel to open the file and save it back in CSV for easy update of data.

Standard Fields to Import
Following are standard fields required for proper posting of Requisitions, Purchase Order, Sales Order, Inventory Posting, requirement may differ user to user. User can do more settings after import or before import of items.
ITEMID - The primary key
DisplayProductNumber - The number which will be displayed in items screen
EcoResProductTranslation_Name - Product Name
NAMEALIAS - Product Name
SEARCHNAME - Product Name, its 20 character length (NAMEALIAS, SEARCHNAME both are required to update Search Name column in Items list screen)
ITEMGROUPID - e.g. part, medicine, etc.
InventTableModuleInvent_UnitId - Unit in Inventory section
InventTableModulePurch_UnitId - Unit in purchase section
BOMUnitId - unit in BOM section
InventTableModuleSales_UnitId - Unit in sales section
ECORESPRODUCTTRANSLATION_LANGUAGEID - Language id
PRODUCTSUBTYPE - sub type of product e.g. product or product master
PRODUCTTYPE - item or service
EcoResStorageDimensionGroup_Name - Storage Dimension Group ID (Required before item can be used in transactions)
EcoResTrackingDimensionGroup_Name - Tracking dimension Group ID (Required before item can be used in transactions)
EcoResProductDimensionGroup_Name - Product Dimension Group
MODELGROUPID - Item Model Group
DefaultOrderType - Default order type e.g. "Purchase Order", this is also required to display items in some screens
PurchModel - This is "Yes/No" enum, use this to display last purchase price displayed by default in Purchase Order line item
InventTableModulePurch_OverDeliveryPct - Over delivery %age for purchase order delivery
InventTableModulePurch_UnderDeliveryPct - Under delivery %age for purchase order delivery
CostModel - use if want to use Latest Cost Price parameter in items screen
How to Identify Field Name to import using AX form
If field name are not known, then its simple to see the field name from released products screen, I will describe how to see name of a field on Product Screen. Navigate to Product information system->Common->Released products. Select any of the product from the list and click edit, right click on any of the fields on screen and click Personalize, system will display personalization screen. At personalization screen in Properties section there is System Name section in which field name is written.
See process to identify field name Description in General Tab of items screen. Click on an item and press edit, expand General area->Right Click on Description field and click Personalize, see below screenshot.
It will open the personalize screen, see where field name is displayed:
Now we will see how to search field Description in field list, click on Field Name input box and write Description and click on drop down and select Contains filter, see below screenshot.
System will display the field name in the list, see below screenshot.
Mark the field name and continue your selection of further fields.
To see how to install / import data using Data Migration Framework, refer to my post Import Customers using Data Migration Framework For detailed import process.
_________________________________________________________________________________
Q & A
Update/Change Search Name after upload
To change/update search name once data is inserted, you need to import following two fields in your CSV file and run the import process again. Below are field names:
2. NAMEALIAS
Note: If values are changed only in SearchName field and not in Namealias then Search Name won't be changed in items list, so always change values in both columns and import data again in system, don't use staging to target operation but the complete process of Get staging data and Copy Data to Target needs to be run to take changes place.
How to see error log
Error: For additional warnings or errors, please check the log
To identify the above error, click on Log Button for more details, system will display details in an error text box, see below screenshot:

Click on Log button and another screen will open with error detail, see below screenshot:
_________________________________________________________________________________
AX Version Used: AX2012 RTM
Company: CEU
Entity: Products
Data Migration Framework: Beta Version
Document Version: 1.0
email: mansoor_adeel@yahoo.com
mansoor_adeel@hotmail.com
Thanks it is very good article
ReplyDeletehow do i import financial dimension with the item master.
ReplyDeleteHi all...
ReplyDeleteI need to create a file which should have filename as the fields which i should export...for example..if am exporting custAccount,my filename should be that custAccount...cn anyone help me out??
Thanks...
Hi all...
ReplyDeleteI need to create a file which should have filename as the fields which i should export...for example..if am exporting custAccount,my filename should be that custAccount...cn anyone help me out??
Thanks...
Nice. Very useful information for readers that you have shared. Keep posting like this.Microsoft Dynamics AX implementation partners
ReplyDeleteCool and that i have a keen offer you: What House Renovations Need Council Approval house renovation salary
ReplyDelete